How many times were you forced to quickly shutdown the computer but couldn't because Windows needed to install updates first and then shutdown?
Sometimes I just don't have time to wait for Windows 7 to install updates and then shutdown. This happens at my workplace where due to the fact that electricity stops after work hours are done I must turn off the computer before power outage. So, to get rid of this awful feature (for me) I chose a simple solution. This works by modifying an option from Windows Update Policy Settings. Here are the steps to follow:
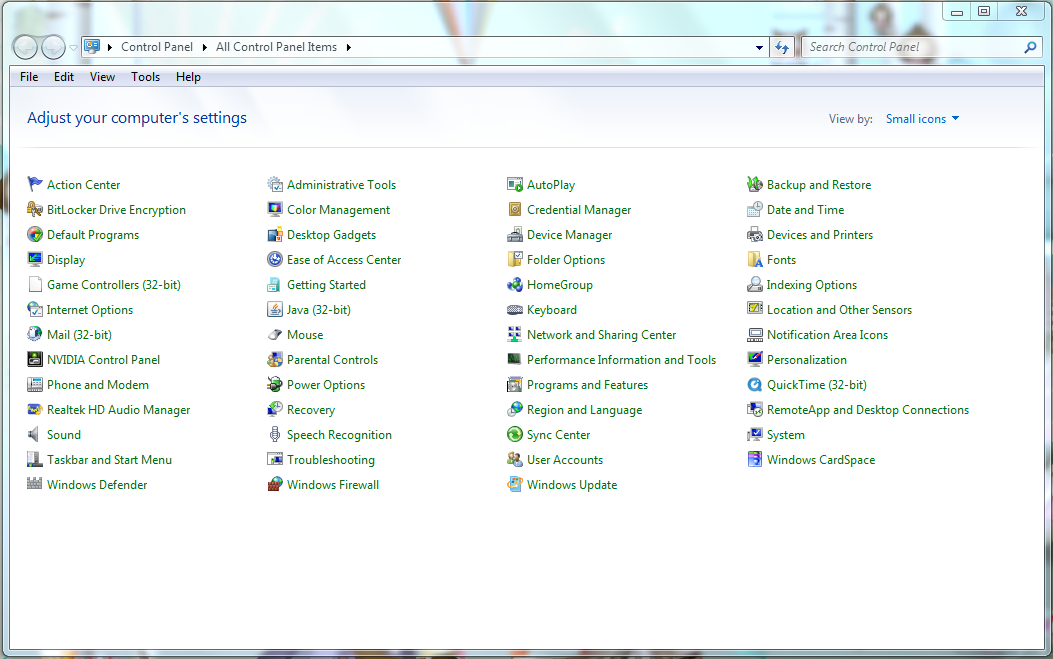
- Open Start menu, enter gpedit.msc in the search box and launch gpedit
- go to User configuration > Administrative templates > Windows components > Windows update
- double click on Do not adjust default option to 'Install Updates and then Shut Down' in Shut Down Windows dialog box to edit option.
-after the edit window opens, click on Enable and then Apply. Close everything and you're done!
Documentation:
http://technet.microsoft.com/en-us/library/bb457141.aspx#ECAA
08 septembrie, 2011
Windows 7 - cum sa inchidem calculatorul fara a instala actualizarile
Ce putem face atunci cand ne grabim sa inchidem calculatorul rapid, dar nu este posibil pentru ca Windows 7 vrea sa instaleze actualizarile inainte de a inchide calculatorul?
Exista mai multe solutii, dar eu o voi prezenta pe cea mai simpla dintre ele. Aceasta presupune modificarea unei setari in Automatic Updates Policy Settings. Asadar, pasii de urmat sunt:
- Deschideti meniul Start , scrieti in casuta de cautare gpedit.msc si apoi lansati gpedit.msc.
- Mergeti la User configuration > Administrative templates > Windows Components > Windows update.
 - Faceti dublu click pe optiunea Do not adjust default option to 'Install Updates and Shut Down' in Shut Down Windows dialog box, selectati Enable si apoi click pe Apply.
Asta este tot. Acum veti putea inchide calculatorul fara probleme cand va grabiti.
Alte informatii:
http://technet.microsoft.com/en-us/library/bb457141.aspx#ECAA
Exista mai multe solutii, dar eu o voi prezenta pe cea mai simpla dintre ele. Aceasta presupune modificarea unei setari in Automatic Updates Policy Settings. Asadar, pasii de urmat sunt:
- Deschideti meniul Start , scrieti in casuta de cautare gpedit.msc si apoi lansati gpedit.msc.
- Mergeti la User configuration > Administrative templates > Windows Components > Windows update.

Asta este tot. Acum veti putea inchide calculatorul fara probleme cand va grabiti.
Alte informatii:
http://technet.microsoft.com/en-us/library/bb457141.aspx#ECAA
28 martie, 2011
Opensuse 11.4 - Install flash player 64bit on Firefox 4 x86_64
Since I started using Firefox 4 beta x86_64 on OpenSuSE 11.3 I noticed that some flash players from different websites were not working properly. On some flash players or flash animations I had white rectangles appearing over images. I hoped that this would be fixed when Firefox 4 would be released or after I upgraded to OpenSuSE 11.4, but the problem persisted.
One solution for this flash player problem would be to uninstall the 64 bit version of Firefox and install the 32 bit version, but this would result in a decrease of speed for Firefox.
The second option is to uninstall the 32 bit version of the flash player which comes with OpenSuSE 11.4 and install a 64 bit version of Adobe Flash which is available from Adobe Labs. They developed Adobe Flash Player "Square" which is a preview release that enables native 64-bit support on Linux, Mac OS, and Windows operating systems.
Before installing flash player "square" you must uninstall the previous version of flash player. To do this, open kick-off menu, go to Computer and click on Install/Remove Software. After the software manager opens, search for "flash" and select to uninstall flash-player and pullin-flash-player.
Now go to http://labs.adobe.com/downloads/flashplayer10_square.html and click on "Download plug-in for 64-bit Linux (TAR.GZ, 4.1 MB)".
Next step is to install the flash player "square":
- go to the location you saved flashplayer10_2_p3_64bit_linux_111710.tar.gz and extract the .tar.gz archive
- copy libflashplayer.so to /usr/lib64/browser-plugins (note that you must do this as root):
Restart Firefox and open a web page that contains flash animations or a flash player that you know previously didn't work.
Important: Please note that if you install the Flash Player "Square" preview, you will need to keep this version up to date by manually installing updates from the Flash Player "Square" download page on Adobe Labs. You will not receive automatic update notifications for future final releases of Flash Player, and you will need to manually uninstall Flash Player "Square" before installing a final shipping version of Flash Player.
One solution for this flash player problem would be to uninstall the 64 bit version of Firefox and install the 32 bit version, but this would result in a decrease of speed for Firefox.
The second option is to uninstall the 32 bit version of the flash player which comes with OpenSuSE 11.4 and install a 64 bit version of Adobe Flash which is available from Adobe Labs. They developed Adobe Flash Player "Square" which is a preview release that enables native 64-bit support on Linux, Mac OS, and Windows operating systems.
Before installing flash player "square" you must uninstall the previous version of flash player. To do this, open kick-off menu, go to Computer and click on Install/Remove Software. After the software manager opens, search for "flash" and select to uninstall flash-player and pullin-flash-player.
Now go to http://labs.adobe.com/downloads/flashplayer10_square.html and click on "Download plug-in for 64-bit Linux (TAR.GZ, 4.1 MB)".
Next step is to install the flash player "square":
- go to the location you saved flashplayer10_2_p3_64bit_linux_111710.tar.gz and extract the .tar.gz archive
- copy libflashplayer.so to /usr/lib64/browser-plugins (note that you must do this as root):
sudo cp libflashplayer.so /usr/lib64/browser-pluginsRestart Firefox and open a web page that contains flash animations or a flash player that you know previously didn't work.
Important: Please note that if you install the Flash Player "Square" preview, you will need to keep this version up to date by manually installing updates from the Flash Player "Square" download page on Adobe Labs. You will not receive automatic update notifications for future final releases of Flash Player, and you will need to manually uninstall Flash Player "Square" before installing a final shipping version of Flash Player.
17 februarie, 2011
Opensuse 11.3 - instalare TV-Maxe, program pentru linux cu posturi tv romanesti online

Dupa cum stiti Opensuse foloseste pachete .rpm pentru instalarea de softuri, de aceea va trebui sa convertim pachetul tvmaxe.deb in pachet .rpm pentru a-l putea instala.
Intai de toate navigati pe aceasta pagina pentru a descarca ultima versiune a TV-Maxe.
De asemenea, pentru a rula corect programul trebuie instalate urmatoarele dependinte: libstdc++5 si sp-sc-auth (executabil sopcast in versiune linie de comanda). Pentru a le descarca faceti click aici (mergeti la sectiunea Sopcast 3.2.6 for Linux) sau faceti click pe urmatoarele linkuri: http://download.easetuner.com/download/sp-auth.tgz si http://www.sopcast.com/download/libstdcpp5.tgz .
Deschideti acum un manager de fisiere (Dolphin daca folositi KDE sau Nautilus pentru Gnome) si navigati spre cele doua fisiere descarcate (de obicei ele sunt salvate de Firefox in folderul /home/nume_utilizator/Downloads). Faceti click dreapta pe fiecare si alegeti Extract here... Vor rezulta 2 foldere, unul intitulat sp-auth care contine executabilul sp-sc-auth, iar celalalt va fi usr si va contine un subfolder numit lib, in care veti regasi fisierele libstdc++.so.5, de tip shortcut si libstdc++.so.5.0.1.
Deschideti un terminal linux si logati-va ca root (tastati su si introduceti parola de administrator).
Navigati catre folderul in care s-au descarcat cele doua dependinte:
cd /home/nume_utilizator/Downloads Tastati urmatoarele comenzi pentru a instala dependintele:
cd sp-auth

cp sp-sc-auth /usr/bin/

cd usr/lib

cp libstdc++.so.5 /usr/lib

cp libstdc++.so.5.0.1 /usr/lib
Pentru a transforma pachetul tvmaxe.deb in pachet .rpm vom folosi programul alien care ar trebui sa fie disponibil deja in repertoriile software ale Opensuse 11.3. Pentru a instala alien tastati urmatoarea comanda:
zypper in alienDupa instalarea alien, putem trece la convertirea pachetului .deb al TV-Maxe in pachet .rpm, dar inainte de aceasta ne intoarcem in folderul Downloads unde este descarcat pachetul tvmaxe.deb:
cd /home/nume_utilizator/Downloadsalien -r tvmaxe.debIn acest moment avem instalate dependintele pentru TV-Maxe si avem disponibil un pachet .rpm pentru instalarea TV-Maxe in Opensuse 11.3. Pentru a instala si TV-Maxe tastati urmatoarea comanda:
zypper in tv-maxe-0.04.1-2.noarch.rpmApasati enter in momentul in care veti fi intrebat daca doriti instalarea programului tvmaxe si asteptati terminarea instalarii.
Acum puteti lansa aplicatia TV-Maxe din meniul Kickoff la sectiunea Multimedia>More Programs>TV-MAXE

Opensuse 11.3 - how to install Mozilla Firefox 4 beta

You can download it and test it on any platform and in this guide I will show you how to install it in Opensuse 11.3
First of all you need to add the latest Firefox test versions repositories to Opensuse 11.3 by following these instructions:
- open a terminal and login as root: open a terminal and type su, hit enter, type in your password and then hit enter again
- type the following commands and hit enter after each command:
zypper ar -r http://download.opensuse.org/repositories/mozilla:/beta/openSUSE_11.3/mozilla:beta.repo
zypper ar -r http://download.opensuse.org/repositories/mozilla/openSUSE_11.3/mozilla.repo

zypper in MozillaFirefox
Wait until Firefox 4 beta finishes installing and then enjoy a nice, unique experience in surfing web.
Here you can find more info on Firefox 4:
http://en.opensuse.org/Firefox
http://www.mozilla.com/en-US/firefox/beta/
Opensuse 11.3 - Instalare Mozilla Firefox 4 beta
Cel mai popular browser de internet, Firefox, pregateste pentru utilizatorii sai Firefox 4, un browser modern, cu o interfata pe masura si cu suport pentru cele mai noi tehnologii in materie de web. Firefox 4 este aproape de lansarea finala a browserului si este disponibila pentru download in versiunea Firefox 4 beta11.
Firefox 4 beta beneficiaza de un buton de Feedback pentru cei care doresc sa impartaseasca dezvoltatorilor aplicatiei aspecte legate de experienta utilizarii browserului si, de ce nu, eventuale propuneri de imbunatatiri. Este un browser modern ce incearca sa tina pasul cu dezvoltarea aplicatiilor web si ofera suport partial (deocamdata) sau total pentru cele mai noi tehnologii web, cum ar fi HTML5 sau CSS3.
Se stie bine faptul ca Firefox este unul dintre cele mai rapide browsere pentru internet, iar noua versiune va fi chiar mai rapida decat Firefox 3.6.13.
Daca doriti sa testati noua versiune de Firefox, puteti afla prin acest ghid cum il instalati in Opensuse 11.3. Iata pasii de urmat:
- mai intai trebuie adaugat repertoriul pentru cea mai noua versiune de test a browserului Firefox. Pentru aceasta puteti accesa aceasta pagina si mergeti la paragraful intitulat "Latest version" (unde veti gasi instructiuni de instalare) sau deschideti o fereastra de terminal si scrieti pe rand urmatoarele comenzi, apasand tasta enter dupa fiecare comanda (introduceti parola de administrator cand vi se cere):
sudo zypper ar -r http://download.opensuse.org/repositories/mozilla:/beta/openSUSE_11.3/mozilla:beta.repo
sudo zypper ar -r http://download.opensuse.org/repositories/mozilla/openSUSE_11.3/mozilla.reposudo zypper in MozillaFirefox Asteptati sa se instaleze si apoi puteti incepe experienta unica a utillizarii celui mai popular browser web intr-o versiune cu o interfata moderna, prietenoasa si cu suport imbunatatit pentru diferitele tehnologii web.
Legaturi:
http://en.opensuse.org/Firefox
http://www.mozilla.com/en-US/firefox/beta/

01 februarie, 2011
Windows 7 - How to share a folder
In the previous article we learned how to enable file sharing in Windows 7. Now you will see how to share a folder in Windows 7.
There are more than one way to share a folder and in this tutorial I'll show the one I consider the fastest and simplest.
Navigate to the folder you wish to share and right-click it and choose Properties. After the properties window appears, go to the Share tab and click on Advanced Sharing...:
 In the Advanced Sharing window click the Share this folder check box, enter a name for your share and
then click on Permissions to set the folder's permissions:
 In the Permissions window you can set the network users rights on your shared folder. You can give full control over folder meaning read/write access or you can make it read only. To give full access to your network folder click the Full control check box. To make it read only make sure only the Read check box is checked:
 Now click OK to close the Permissions window, then click Apply and then OK to close the Advance Sharing window and your folder will appear in your network.
There are more than one way to share a folder and in this tutorial I'll show the one I consider the fastest and simplest.
Navigate to the folder you wish to share and right-click it and choose Properties. After the properties window appears, go to the Share tab and click on Advanced Sharing...:

then click on Permissions to set the folder's permissions:


31 ianuarie, 2011
Windows 7 - How to enable files and folders sharing
In this tutorial I would like to help Windows 7 users who migrated to 7 straight from Windows XP, how to join a network and share files and folders on the network.
First of all you need a Windows 7 computer connected to a local area network. Network computers must be on the same workgroup so you can easily share files and folders between them.
To join the workgroup in your local network:
Open the Start menu and then right click Computer and choose Properties:

In the Properties window navigate to Computer name, domain and workgroup settings and click Change Settings:
 A new window will appear. Here you can enter a brief descriprion of your computer (optionally). To join a workgroup click on Change button:
 In the new window enter you computer's name and the workgroup's name and click Ok.
 A welcome to the workgroup message will appear and click Ok. Then a warning message will pop up and click Ok to close it. Now click Close on the System Properties window and restart your computer.
Now your computer is on a Workgroup in your local area network but due to Windows 7 default network settings your computer is not yet ready to share files and folders. To enable file sharing you must:
Open Control Panel from the Start button and then go to Network and Sharing Center:
 In the Network and Sharing Center window click on Change Advanced Sharing Settings from the left panel:
 To enable file sharing and make you computer discoverable on the network make sure you check the settings like in the picture below:
 Restart computer for all the changes to take effect.
First of all you need a Windows 7 computer connected to a local area network. Network computers must be on the same workgroup so you can easily share files and folders between them.
To join the workgroup in your local network:
Open the Start menu and then right click Computer and choose Properties:

In the Properties window navigate to Computer name, domain and workgroup settings and click Change Settings:


Now your computer is on a Workgroup in your local area network but due to Windows 7 default network settings your computer is not yet ready to share files and folders. To enable file sharing you must:
Open Control Panel from the Start button and then go to Network and Sharing Center:


29 ianuarie, 2011
Windows 7 - How to uninstall Internet Explorer 8
I have recently found a question on internet from a kid, I think, who wanted to uninstall Internet Explorer from Windows. The solutions given by the answers he received weren't accurate enough so I hope this guide woill help him or anyone else who wants to uninstall a Windows feature. This is quite easy and for this you need to follow these simple steps:
First of all you must know you must be logged in as an administrator to perform this task.
Click the Start menu and open Control Panel.
After Control Panel opens, click on Programs and Features.

When the Programs and Features windows appears, go to the task pane and click on Turn Windows features on or off.

A new windows with a list of all Windows components will appear. Now search for Internet Explorer and clear the checkbox next to Internet Explorer, then click OK.

A warning message will pop up where you click OK.
Now Windows will uninstall Internet Explorer and after this your computer will be restarted.
If you want to do the same on other versions of Windows follow this link: click here
First of all you must know you must be logged in as an administrator to perform this task.
Click the Start menu and open Control Panel.
After Control Panel opens, click on Programs and Features.
When the Programs and Features windows appears, go to the task pane and click on Turn Windows features on or off.

A new windows with a list of all Windows components will appear. Now search for Internet Explorer and clear the checkbox next to Internet Explorer, then click OK.

A warning message will pop up where you click OK.
Now Windows will uninstall Internet Explorer and after this your computer will be restarted.
If you want to do the same on other versions of Windows follow this link: click here
28 ianuarie, 2011
Anunt publicitar achizitie directa - Muzeul National Peles
In atentia operatorilor economici interesati
1. Emitent: Muzeul National Peles cu sediul in Sinaia, str. Pelesului, nr. 2, jud. Prahova, cod postal 106100, telefon 0244.310918, 0244.312184, fax 0244.312416, cod fiscal RO 27312381, cont trezorerie RO16TREZ5255003XXX000835 deschis la Trezoreria Sinaia
3. Metoda de selectie interna si atribuire contract: Studiu de piata
4. Forma contractului: contract de service
5. Obiectul contractului: servicii de revizie periodică trimestrială şi intervenţii accidentale la echipamente informatice M. N. Peles
6. Cod CPV rev. 2: 50312000-5
7. Locul de prestare: sediul M. N. Peles
8. Caiet de sarcini: la solicitarea operatorilor economici interesati (fax, e-mail etc)
9. Propunerea financiara si propunerea tehnica: conform caiet sarcini
10. Sursa de finantare: bugetul de stat
11. Criterii minime de calificare: conform caiet sarcini
Documente minime solicitate:
- Certificat de inregistrare de ORC - copie conforma cu originalul
- Certificate de autorizare/atestare a calitatii solicitate potrivit obiectului contractului - copie conforma cu originalul
- Certificat fiscal eliberat de Administratia Financiara teritoriala la care este arondat sediul persoanei fizice sau juridice, dupa caz - copie conforma cu originalul/original
- Alte documente care vor fi considerate necesare, dupa caz
12. Perioada de valabilitate a ofertelor: 60 de zile de la data depunerii ofertelor
13. Perioada de derulare a contractului: conform caiet sarcini
14. Pretul: va fi exprimat in lei fara tva
15. Valoarea estimata a contractului: 2680 lei fara tva (623.25 euro fara tva)
16. Criteriul de atribuire: pretul cel mai scazut, rezultat conform Studiu de piata
17. Data maxima de depunere a ofertelor prin fax, e-mail, scrisoare recomandata etc. la adresa sediului precizat mai sus: 10 zile lucratoare de la data publicarii sau solicitarii caietului de sarcini, dar nu mai tarziu de 15.02.2011
18. Data comunicarii rezultatelor ofertelor depuse: 3 zile de la data aprobarii raportului de atribuire a cumpararii directe prin studiul de piata
19. Alte clarificari si solicitari de informatii pot fi obtinute de la Serviciul Achizitii Publice, int. 108, telefon 0244.310918, 0244.312184, fax 0244.312416 sau Sef Serviciu Achizitii Publice - jr. Dragos Sandu, telefon 0720.020244.
http://achizitiipublice-stmd.blogspot.com
1. Emitent: Muzeul National Peles cu sediul in Sinaia, str. Pelesului, nr. 2, jud. Prahova, cod postal 106100, telefon 0244.310918, 0244.312184, fax 0244.312416, cod fiscal RO 27312381, cont trezorerie RO16TREZ5255003XXX000835 deschis la Trezoreria Sinaia
2. Procedura aplicata: Achizitie directa conf. art. 19 din O.U.G. nr. 34/2006
3. Metoda de selectie interna si atribuire contract: Studiu de piata
4. Forma contractului: contract de service
5. Obiectul contractului: servicii de revizie periodică trimestrială şi intervenţii accidentale la echipamente informatice M. N. Peles
6. Cod CPV rev. 2: 50312000-5
7. Locul de prestare: sediul M. N. Peles
8. Caiet de sarcini: la solicitarea operatorilor economici interesati (fax, e-mail etc)
9. Propunerea financiara si propunerea tehnica: conform caiet sarcini
10. Sursa de finantare: bugetul de stat
11. Criterii minime de calificare: conform caiet sarcini
Documente minime solicitate:
- Certificat de inregistrare de ORC - copie conforma cu originalul
- Certificate de autorizare/atestare a calitatii solicitate potrivit obiectului contractului - copie conforma cu originalul
- Certificat fiscal eliberat de Administratia Financiara teritoriala la care este arondat sediul persoanei fizice sau juridice, dupa caz - copie conforma cu originalul/original
- Alte documente care vor fi considerate necesare, dupa caz
12. Perioada de valabilitate a ofertelor: 60 de zile de la data depunerii ofertelor
13. Perioada de derulare a contractului: conform caiet sarcini
14. Pretul: va fi exprimat in lei fara tva
15. Valoarea estimata a contractului: 2680 lei fara tva (623.25 euro fara tva)
16. Criteriul de atribuire: pretul cel mai scazut, rezultat conform Studiu de piata
17. Data maxima de depunere a ofertelor prin fax, e-mail, scrisoare recomandata etc. la adresa sediului precizat mai sus: 10 zile lucratoare de la data publicarii sau solicitarii caietului de sarcini, dar nu mai tarziu de 15.02.2011
18. Data comunicarii rezultatelor ofertelor depuse: 3 zile de la data aprobarii raportului de atribuire a cumpararii directe prin studiul de piata
19. Alte clarificari si solicitari de informatii pot fi obtinute de la Serviciul Achizitii Publice, int. 108, telefon 0244.310918, 0244.312184, fax 0244.312416 sau Sef Serviciu Achizitii Publice - jr. Dragos Sandu, telefon 0720.020244.
http://achizitiipublice-stmd.blogspot.com
27 ianuarie, 2011
Windows XP - How to add your computer to a workgroup
If your computer is already part of a network, you can join a certain workgroup so you can see all the computers on the network. To join a workgroup follow some simple steps:
Open Start Menu and right click on My Computer and choose Properties.
 When the properties window appears, go to Computer Name tab and click on it. On this tab you can enter a computer description (optionally, if you want network users to easy recognize your computer). Click on Change to enter the workgroup name in your network (if you don't know it, just ask the network administrator for the workgroup name).

A new window will appear. Here you can enter your computer's name and then make sure Workgroup is checked and enter the workgroup name.Click OK and then restart your computer.
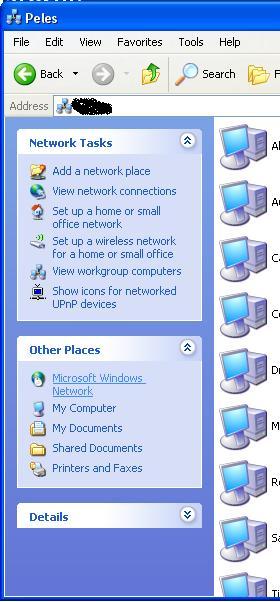
To see computers on the workgroup, open Network Places (from the Start Menu or open My Computer and click on My Network Places on the left panel), then click View Workgroup Computers on the Network Tasks panel on the left.
 If you want to see computers from other workgroups in your local network (if there are any), follow the step above and then click on Microsoft Windows Network from the Other Places panel on the left.

Open Start Menu and right click on My Computer and choose Properties.


A new window will appear. Here you can enter your computer's name and then make sure Workgroup is checked and enter the workgroup name.Click OK and then restart your computer.
To see computers on the workgroup, open Network Places (from the Start Menu or open My Computer and click on My Network Places on the left panel), then click View Workgroup Computers on the Network Tasks panel on the left.

24 ianuarie, 2011
Windows cannot start because the following file is missing or corrupt: vgaoem.fon (EN)
Few days ago my Windows XP Professional failed to start due to a power blackout and showed the following error:
Windows failed to start because the following file is missing or corrupt:
C:\WINDOWS\SYSTEM\vgaoem.fon
If for some reason this happens to you too, don't panic, the solution is very simple. Just make sure you have a Windows XP installation cd and follow these simple steps:
Setup your computer to boot from cd (do this from BIOS or press F12 or F11 to change the boot sequence; might be a good idea to check your motherboard manual first to see how to change the boot order). Insert your Windows XP installation cd and restart computer.
When the "Press any key to boot from cd..." appears, press any key to start computer from installation cd.
After the Welcome screen appears, press R to start Recovery console.
Choose the operating system and press enter. Type in the administrator password and hit enter or just hit enter if you don't have a password.
Type map and hit enter to see which letter is assigned to the cdrom device containing the installation CD.
Type the following command to copy and expand vgaoem.fon file (replace E : with the corresponding letter of your cd-rom drive. Do the same with C, replacing it with the corresponding letter of the partition where Windows is installed), then press enter):
expand E:\i386\vgaoem.fo_ C:\windows\system
Notice the underscore after "o" in "vgaoem.fo_".
A message confirming the operation will be displayed.
Type exit to reboot computer and remove the Windows installation cd. Now your Windows Xp should be fixed and start normally.
See here an official Micorosft guide for this: http://support.microsoft.com/?kbid=315338
Windows cannot start because the following file is missing or corrupt: vgaoem.fon (RO)
Mesajul de eroare ce face titlul acestui articol, s-a intamplat sa imi apara dupa o pana de curent cand aveam calculatorul pornit. In cazul de fata fisierul cu erori este vgaoem.fon, insa aceasta eroare poate aparea si in cazul altor fisiere, cum de altfel mi s-a si intamplat.
Nu va speriati atunci cand observati ca Windows XP nu mai porneste dupa o pana de curent sau alte probleme cu tensiunea din prize (fluctuatii de tensiune). De obicei solutia este simpla, ca si in cazul acesta.
Pentru a rezolva problema asigurati-va ca aveti un CD de instalare de Windows XP si setati BIOS-ul sa booteze de pe CD (intrati in BIOS si modificati secventa de boot sau la pornirea calculatorului apasati F12 sau F11 in functie de placa de baza pe care o aveti).
Asadar, pasii sunt urmatorii:
Introduceti CD-ul in unitate si reporniti calculatorul, selectand apoi ca mediu de boot CD-ul (vezi mai sus), apoi la aparitia mesajului "Press any key to boot from CD", apasati orice tasta pentru a boota de pe CD.
Dupa ce apare interfata de instalare a Windows si meniul cu optiuni apasati "R" pentru a intra in Recovery console.
Dupa ce s-a deschis interfata MS-DOS a consolei, selectati sistemul de operare si apoi introduceti parola de administrator (daca exista, daca nu, apasati enter).
Tastati map si apasati Enter pentru a putea vedea ce litera corespunde unitatii optice (ex. E:\Device\CDrom0).
Tastati urmatoarea comanda (inlocuiti CD_ROM drive cu litera corespunzatoare unitatii optice care contine cd-ul de instalare, iar drive reprezinta litera corespunzatoare partitiei pe care este instalat sistemul de operare, de obicei C) pentru a copia fisierul vgaoem.fon de pe cd-ul de instalare in directorul Windows:
Va aparea un mesaj de confirmare a operatiunii, dupa care tastati exit si apasati enter pentru a reporni calculatorul. Scoateti cd-ul de instalare al Windows si porniti normal calculatorul (daca e nevoie setati ca prim mediu de boot hard diskul). In acest moment, Windows XP ar trebui sa porneasca normal.
Aici gasiti un ghid Microsoft pentru aceasta problema: http://support.microsoft.com/?kbid=315338
Nu va speriati atunci cand observati ca Windows XP nu mai porneste dupa o pana de curent sau alte probleme cu tensiunea din prize (fluctuatii de tensiune). De obicei solutia este simpla, ca si in cazul acesta.
Pentru a rezolva problema asigurati-va ca aveti un CD de instalare de Windows XP si setati BIOS-ul sa booteze de pe CD (intrati in BIOS si modificati secventa de boot sau la pornirea calculatorului apasati F12 sau F11 in functie de placa de baza pe care o aveti).
Asadar, pasii sunt urmatorii:
Introduceti CD-ul in unitate si reporniti calculatorul, selectand apoi ca mediu de boot CD-ul (vezi mai sus), apoi la aparitia mesajului "Press any key to boot from CD", apasati orice tasta pentru a boota de pe CD.
Dupa ce apare interfata de instalare a Windows si meniul cu optiuni apasati "R" pentru a intra in Recovery console.
Dupa ce s-a deschis interfata MS-DOS a consolei, selectati sistemul de operare si apoi introduceti parola de administrator (daca exista, daca nu, apasati enter).
Tastati map si apasati Enter pentru a putea vedea ce litera corespunde unitatii optice (ex. E:\Device\CDrom0).
Tastati urmatoarea comanda (inlocuiti CD_ROM drive cu litera corespunzatoare unitatii optice care contine cd-ul de instalare, iar drive reprezinta litera corespunzatoare partitiei pe care este instalat sistemul de operare, de obicei C) pentru a copia fisierul vgaoem.fon de pe cd-ul de instalare in directorul Windows:
expand CD-ROM drive:\i386\vgaoem.fo_ drive:\windows\system
Atentie: observati in comanda de mai sus prezenta caracterului underscore sau "liniuta jos" dupa litera "o" in "vgaoem.fo_"Va aparea un mesaj de confirmare a operatiunii, dupa care tastati exit si apasati enter pentru a reporni calculatorul. Scoateti cd-ul de instalare al Windows si porniti normal calculatorul (daca e nevoie setati ca prim mediu de boot hard diskul). In acest moment, Windows XP ar trebui sa porneasca normal.
Aici gasiti un ghid Microsoft pentru aceasta problema: http://support.microsoft.com/?kbid=315338
18 ianuarie, 2011
TV-Maxe - TV online pentru Linux cu canale romanesti
De mult timp, mai exact inca de cand am inceput sa folosesc Linux, am cautat o solutie simpla si usoara pentru vizualizarea pe Linux a posturilor tv romanesti care ofera si un stream live pe internet. Pana acum putin timp nu am gasit nimic, insa recent am descoperit TV Maxe.
TV Maxe este un program scris in limbaj python de catre un impatimit al Linuxului din Romania, care a incercat sa rezolve si, intre noi fie vorba a reusit cu succes, realizarea unui programel care, folosind ca player video mplayer si/sau vlc player, cat si pluginul pentru Linux al Sopcast, permite vizualizarea de posturi tv romanesti online.
Programul ofera un playlist predefinit cu posturi tv romanesti, iar cu un simplu click dreapta pe unul dintre posturi puteti vizualiza grila de programe a postului respectiv. Calitatea streamurilor variaza, insa majoritatea pot fi vizionate la o calitate inalta a imaginii. De asemenea, cum tot mai des televiziunile emit in raport 16:9, puteti selecta din program modul de afisare 4:3 sau 16:9. TV Maxe poate fi folosit si cu o telecomanda compatibila cu Linux, pe care o puteti configura din program.
Pentru utilizatorii de Linux Mint sau Ubuntu, TV Maxe se poate instala usor folosind pachetul .deb, care contine tot ce este necesar, disponibil aici.
Pentru instalarea TV-Maxe in OpenSUSE 11.3 aveti pe aceasta pagina un ghid util.
Puteti gasi si alte lucruri interesante pa pagina programatorului: http://blog.ov1d1u.net

Abonați-vă la:
Comentarii (Atom)